Monday, November 25, 2013
VERY JAPANESE CAKE - Matcha –Black Sesame Mousse Cake
Ever since I started baking home-made cakes for friends' birthday, matching the right cake with the right person is getting more challenging these days as I have started to running out of ideas. For my friend Eliz's birthday last month, we decided to throw her a surprise party with a Japanese sashimi theme. Going along that theme, I wanted to bake a Japanese flavor cake with Japanese ingredients. And usually the first cake came to mind is my favorite matcha red bean mousse cake! In the past years, I made this cake so many times that I kind of bored myself from making. So this time I wanted to make something new. I surfed the web a bit and found this VERY Japanese cake - Matcha Black Sesame Mousse Cake combining 2 of my favorite flavors together. I knew right away this is the cake I wanted to bake and perfect.
This cake reminds me of my trips to Japan and my love for Japanese pastries. I can't wait to share!
Black sesame cake
Ingredients
• 1 ¼ cups unbleached all-purpose flour
• 1 ¼ teaspoons baking powder
• ¼ teaspoon fine sea salt
• 2 tablespoons black sesame seeds
• 2 table spoons back sesame paste
• 1 large egg, room temperature
• ½ teaspoon pure vanilla extract
• 6 tablespoon unsalted butter, softened
• ¾ cup sugar
• ½ cup, plus 2 tablespoons canned unsweetened coconut milk
Procedures
1. Adjust oven rack to middle position and heat oven to 350F.
2. Grease one 8-inch round cake pan, line bottom with parchment paper, duct cake pan with flour, and tap out excess.
3. In a medium bowl, whisk flour, baking powder and salt together, set aside.
4. Toast the sesame seeds in a dry pan over medium heat, stirring constantly, until they are fragrant, about two minutes. Grind (or pound) the toasted black sesame seeds in a spice grinder until they are the texture of damp sand. Combine grounded sesame seeds, sesame paste, eggs and vanilla in a 1 cup measuring cup, stir to combine, set aside.
5. In a bowl of standing mixture (or use a hand-mixer), beat butter and sugar on medium-low speed until sugar is moistened, about 30 sec. Increase speed to medium-high and beat until mixture is light and fluffy, about 3 minutes. Reduce speed to medium, add sesame mixture (from step 4) in two additions, beat until combined.
6. Reduce speed to low, add dry ingredients in 3 additions, alternating with coconut milk (in 2 additions), beginning and ending with dry ingredients. Remove bowl from mixture, stir batter by hand with a rubber spatula to ensure there are no streak of flour left on the bottom of the bowl. Pour batter and spread evenly in the prepared cake pan.
7. Bake cake until toothpick inserted into center of the cake comes out clean, about 25-35 minutes. Cool cake and slice cake horizontally in half into 2 even layers.
Matcha Mousse
Ingredients
• 4 large egg yolks
• 1/3 cup (2 oz) granulated sugar
• 1/8 teaspoon fine sea salt
• ½ cup coconut milk, plus 2 tablespoon
• 2 tablespoon water, 1 tablespoon powdered gelatin
• 1 tablespoon water
• 1 teaspoon matcha powder
• 1 teaspoon pure vanilla extract
• 1 ¾ cup (14 oz) heavy cream, divided
• 1 tablespoon superfine sugar
Procedures
1. In a medium bowl, whisk egg yolks, sugar, and salt until smooth and fully combined, set aside.
2. Combine 2 tablespoons coconut milk and water in a small bowl, sprinkle gelatin over top and let bloom for 5 minutes, then steam it over boiling water (about 2 minutes). Combine water with matcha powder in a separate small bowl, stir to combine, set aside.
3. Add ½ cup of coconut milk and ¾ cup heavy cream to a medium saucepan and bring to simmer. Remove from heat, in a steady stream, pour into yolk mixture; whisk constantly to prevent curdling. Pour mixture back into saucepan, and cook over medium heat until mixture has thicken and coasts the back of a spoon, stirring constantly.
4. Remove pan from heat and stir in gelatin mixture until dissolved. Stir in matcha mixture and vanilla until incorporated. Pour matcha cream through fine-mesh strainer into nonreactive bowl. Cover surface directly with plastic wrap and let cool (refrigerate if making ahead).
5. With a hand-mixture, whish remaining 1 cup heavy cream and superfine sugar to soft peak. Gently fold whipped cream into matcha cream until incorporated with no white streaks.
White sesame mousse
Ingredients
• 4 large egg yolks
• 1/3 cup (2oz) granulated sugar
• 2 tablespoons sesame paste or tahini (I used tahini)
• 1/8 teaspoon fine sea salt
• ¾ cup whole milk (I used 2% milk)
• 1 tablespoon powdered gelatin
• 1 tablespoon water
• 1 teaspoon pure vanilla extract
• 1 ¾ (14 oz) heavy cream, divided
• 1 tablespoon superfine sugar
Procedures
1. In a medium bowl, whisk egg yolks, sugar, sesame paste (or tahini) and salt until smooth and fully combined.
2. Combine 2 tablespoons coconut milk and water in a small bowl, sprinkle with gelatin over top and let bloom for 5 minutes, then steam it over boiling water (about 2 minutes).
3. Add ¾ cup of milk and ¾ heavy cream to a medium saucepan and bring to simmer. Remove from heat, in a steady stream, pour into egg yolk mixture in step 2; whisk constantly to prevent curdling. Pour mixture back into a saucepan, and cook over medium heat until mixture has thickened and coats the back of a spoon, stirring constantly.
4. Remove pan from heat and stir in gelatin mixture until dissolved. Stir in vanilla until incorporated. Pour sesame cream through fine-mesh strainer into a bowl. Cover surface directly with plastic wrap and let cool (refrigerate if making ahead).
5. With a hand-mixture, whish remaining 1 cup heavy cream and superfine sugar to soft peak. Gently fold whipped cream into matcha cream until incorporated with no white streaks.
Assembly
This cake has 4 layers and should be assembled in the following order:
Bottom layer – Black sesame cake
2nd layer – matcha mousse
3rd layer – black sesame cake
4th layer – white sesame mousse
Top – garnish with matcha powder (~2 tablespoons)
Procedures:
1. Using the 9 inch pan, place one black sesame cake layer on the bottom-center, spread matcha mousse evenly on top and side of cake layer. Smooth top with small spatula, cove and refrigerate for 30 min.
2. Remove cake from fridge, center remaining cake layer on top of firm matcha mousse and spread sesame mousse evenly on top and side of cake. Smooth top and refrigerate for 30 min.
3. Remove cake from fridge, decorate cake with matcha powder, black sesame seed (optional) as desired.
Tuesday, April 24, 2012
Chocolate-Almond Genoise Layer Cake with coffee butter cream
This is the birthday cake I made for my dearly god sister's birthday this year. My god sister has been deeply spoiled by me in the past few years being my dessert tasting guinness pig. Now she's more picky on cake than ever - she specifically requested from me not to bake her any green tea red bean favor cake for her birthday as she is tired of it! To make the remaining choices even more limited, she doesn't like any fruity favor cake. So cakes like strawberry shortcake, Chinese style fruit cake, or any type of cake with berries are all out! In researching for a cake she would like, I knew I had to go along the line of chocolates or coffee. This chocolate almond genoise and coffee butter cream layer cake has the best of both favors. It's a hybrid recipe I combined together from two recipes, neither of which I had tried before. But I think after making them and having to receiving good comments, I am confidence that they taste pretty good and more importantly they are not difficult to make.
The cake layer is created based off a simple Italian genoise sponge cake recipe using almond flour and the chiffron cake technique (beating the egg white separately).
Chocolate genoise
• 4 eggs, room temperature
• 1 cup confectioners sugar
• 1 cup almond flour
• 6 tablespoon chocolate powder
• ¼ cup all purpose flour
• 4 egg whites, room temperature
• 4 tablespoon white granulated sugar
Directions
Preheat the oven to 425 degrees. Grease an 11×17(or 12×16) sheet pan with shortening. Line with parchment and grease parchment paper. Set aside.
Combine the 2 whole eggs, confectioners’ sugar and almond flour in a bowl. Combine with a hand-held mixer until batter has lightened considerably in color.(Should be a pale yellow.) Add the 1½ tsp. matcha powder and mix on low speed until combined. Set aside.
Whip the egg whites in a clean bowl on low speed until they start to froth. Add the cream of tartar and increase mixer speed, whipping until stiff peaks form. Add the 2 tbsp. granulated sugar and whip for a few seconds longer to incorporate.
Sift the flour over the pale yellow egg mixture, then scoop about ⅓ of the egg whites into the egg mixture and fold together gently with a rubber spatula. Add the remaining egg whites and fold in until uniformly mixed.
Pour the batter into the sheet pan and distribute it evenly with an offset spatula, making the layer as level and smooth as possible. Your batter will be spread very THIN.
Bake for about 8-12 minutes until the cake is just firm. Keep an eye on the cake as it bakes! It will burn easily!
Remove from the oven and turn out cake onto a cooling rack. Remove parchment. Allow to cool slightly. Cut cake into four even pieces.
Coffee butter cream (recipe adopted from Chef Defontaine's popular Paris pastisserie- Le Royale au Cafe)
• ¾ cup (or a bit less) cup sugar
• ½ cup water
• 6 large egg yolks
• 2 ½ sticks unsalted butter (cut into pieces, softened)
• 1 (starbucks) expresso shot (about 2-2.5 tablespoon)
Bring the sugar and water to a boil in a small heavy saucepan over medium-low heat, stirring to dissolve the sugar, about 4 minutes. Let the mixture boil for 3 or 4 minutes, until it forms a soft ball (234-240 degree).
Meanwhile, beat the egg yolks with an electric mixer until fluffy.
As soon as the syrup is ready, with the machine running, pour the syrup onto the beaters in a very thin, steady stream until all the syrup is incorporated. Continue to beat until the mixture is fluffy and cooled to room temperature.
Add the butter, 1 or 2 pieces at a time, beating until the mixture is well blended and fluffy. Add the expresso to the butter cream and beat until well blended.
Assemble the cake:
Cut the cake into 4 even pieces
Place the bottom layer on a platter or a piece of card board cut slightly larger than the cake. With a spatula, spread about butter cream (thin layer or a bit thicker depending on one’s taste) on the layer. Gently place the second layer on top, spread another layer of butter cream, repeat to have 4 layers of cake and 4 layer of cream fillings (total of 8 layers).
Monday, January 2, 2012
Skillet Roasted Chicken
Long over-due for cooking new dishes! The last 2 months had been crazy busy for me. I went on a 3.5 week vacation, 1 week for work training, and then took another short trip. Finally I have returned back home for the holidays and had have the luxury to cook again.
This is one of the dishes I cooked for our Christmas dinner this year. This skillet roasted chicken was featured in the front cover of the Bon Appetit magazine which was lent to be from one of my favorite colleagues who was dying to share this with me when he first saw it. This skillet roasted chicken is from the #1 restaurant in the States. With this hype, I gotta try it out right?
I have never really roasted a whole chicken at home before. It always seems like roasting a whole chicken is a very troublesome process which involving preparing the whole chicken all the way to cleaning up the oven after all the splattering of the chicken oil. This recipe is a bit different than others I have looked at before. The key to this dish is prepoaching the chicken in an immersion circulator: cooking the chicken sous vide (French for “under vacuum”). This restaurant technique locks in moisture and keeps the food in contact with flavor-boosting seasonings. The vacuum-sealed item (usually protein) is poached in a bag at a low, controlled temperature that ensures optimum doneness. So the trick to this recipe is the “hot-water baths” used before the chicken is placed into the oven. Since most home cook at home don’t have a immersion circulator, this recipe teaches us a home-cook friendly method to get an almost-perfect vacuum inside an everyday resealable plastic bag (please look at the step 4 below to show you how).
Ingredients
· 1/3 cup extra-virgin olive oil
· 3 Tbsp. chopped fresh chives
· 2 Tbsp. chopped fresh thyme
· 1 Tbsp. chopped fresh Chervil (I actually skipped this one as I couldn’t find it in the super market)
· 1 Tbsp. chopped flat-leaf parsley
· 1 Tbsp. chopped fresh tarragon
· 2 garlic cloves, finely chopped
· 1 tsp. finely grated lemon zest
· ½ tsp. freshly ground black pepper
· 1 (2-3lbs) chicken, halved
· 2 ½ tsp. kosher salt
Procedures
1. Whisk 1/3 cup oil oil, 1 Tbsp. chives and next 7 ingredients in a medium bowl.
2. Divide marinade between 2 (gallon-size) resealable plastic freezer bags.
3. Season chicken with 2 ½ tsp. salt, place 1 chicken half in each bag. Seal bag, release excess air, chill overnight.
4. Place bags side by side in a large pot. Add cold water to cover by 2’’. Heat water over medium heat until an instant-read thermometer registers 150 degree.
5. Turn off heat, cover, and poach chicken for 50 minutes.
6. Transfer bags to a large bowl of ice water to cool, about 15 minutes. Remove the chicken from bags; pat dry.
7. Preheat oven to 450 degree.
8. Heat vegetable oil in a large cast-iron skillet over high heat. Add chicken halves, skin side down, so chicken sits against sides of pan. Cook, moving chicken occasionally for even cooking, until skin is browned all over. Flip chicken and transfer skillet to oven. (note that I skipped this instead as I didn’t want to get the kitchen all smoky. As a result, I had to leave my chicken in the over longer (about 28 minute in the oven instead of 15 minutes)
9. Roast until an instant-read thermometer inserted into thickest part of thight registers 165 degree, about 15 minutes. Let rest for 10 minutes.
Again, since I skip the skillet procedure, I had to leave my chicken in the oven to cook longer. I first tried 20 minute and the chicken was still a bit red in the inside and not too brown on the outside so I let it cooked for another 8 minute then it turn out almost perfect – got a nice brown coding outside and still very juicy inside the meat. I think the poaching procedures works very well on the chicken in order to give it moisture and tenderness. So the extra pre-poaching step here it’s actually worth a try!
Saturday, August 27, 2011
Baked Mochi Cake 焗年糕
I had this baked mochi cake (or rice cake) from Rachel's place. It's tasted so comforting that I immediately fell in love with it at first bite! Thanks Rachel for sharing this yummy rice cake recipe with me. It's very easy to make. The preparation takes less than 20 min w/o the baking time. I thought this would be a good recipe to share :)
Ingredients:
Butter: 1 cube
Egg: 5 large eggs
Milk: 3 cups (i used 1% milk)
Baking Powder: 2 teaspoon
Sugar: 1 cup
Rice flour: 1 box of Mochiko rice flour (can find in most Asian market, i.e Ranch 99)
Red Bean: 1 can
Procedures:
- Warm up milk in the pan with sliced butter, turn off the heat when it gets luke warm.
- With electric mixer, mix eggs well. Add in the sugar and baking powder. Mix well until creamy
- Pour the milk and butter mixture (from step 1) to step 2 and mix well.
- Add rice flour, little by little, to the above mixture.
- butter a cake pan (~8'')or a glass pan, spread the red bean over the bottom of the pan, and pour in the batter
- Pre-heat over at 350, bake for about 1 hour

Sunday, June 26, 2011
Pound Cake - the classic recipe

Pound cake has earned its centuries-long popularity. It owes its name to the traditional ingredient - one pound each of flour, butter, sugar, and eggs- which remain essentially the same today. As for all my recipes, I tend to air on the lighter side on sugar and butter. Instead of using all the butter the recipe calls for I used 1/2 cup sour cream in place of 1 stick of butter so that the cake remain airy and rich, not tough a dense. I also cut the sugar by 1/4 as my mom doesn't like it too sweet.
The recipe I have below is the classic recipe. I know no matter how pure and wholly satisfying the original, variations are too tempting to resist. You can feel free to dress up the classic version in creative ways, with sprinkled toppings, adding fruits such as blueberries, and easy glazes and saurces. Since I am making this for my mom's teacher, I am staying conservative to only adding peacan to the classic recipe.
Note that the below recipe makes a delicious tranditional pound cake, and it's also the base for inventive variations. Recipe makes two 5-by-9-inch loaf pans.
Ingredients:
-1 pound (31/4 cups) all-purpose flour
-1 tablespoon coarse salt
-3 stick of softened unsalted butter
-1/2 cup sour cream (non-fat)
-1 1/2 cup of sugar
-1 teaspoon pure vanilla extract
-9 large egg (room temperature)
-1/2 cup toasted peacan
Procedures:
*Preheat over to 325 degree, butter two 5-by-9-inch loaf pans.
1) Combine the flour and salt in a bowl (see number 2 below)
2) Cream the softened butter, sour cream, and sugar with a mixer on high speed until pale and fluffy, for 8 minutes
3) Scape down sides of bowl, reduce speed to medium and add in the vanilla extract
4) Lightly beat 9 large, room-temperature eggs, and add in 4 additions, mixing thoroughly after each and scraping down sides
5) Reduce speed to low, and add flour mixture in 4 additions, mixing until just incorporated
6) add in the peacan until incorporated
6) divide batter between pans. Tap on counter to distribute and smooth tops.
Bake until a tester inserted into center of each cake comes out clean, about 65 minutes. Let cool in pans on a wire rack for another 30 minutes before removing from pans.
This is the end product. I didn't use my usual loaf pan because we had to give it to the teachers. So use the paper container I got from Daiso. Still works!Thursday, May 5, 2011
Mini Fruit Tarts
As things slow down on BSE (client) last week, and as an appreciation to their helps this year, I baked them a batch of mini fruit tarts. I have made large fruit tarts before. Making mini fruit tarts, however, it's my first time. The recipe and procedures are the same. The only difference is that you are working off mini pieces pastry dough vs. the one huge dough you need to roll out for the big tarts. And as expected, rolling out the mini dough is much easier because when the dough is smaller the risk of breaking into clumps and cracks become smaller. In case you haven’t read my post on fruit tarts below, the single biggest stumbling blocks to tart baking (in my opinion) is rolling out the tart dough. So if you are an amateur baker like me and would like to try out making tarts, it’s probably a good idea to start with mini fruit tarts.
Since I have shared the fruit tart recipe in my previous post, I am not going to repeat it again. Everything else is the same except for the portion. This time I have doubled the portion of the recipe to make 16 oval shaped tarts and 17 mini muffin tine tarts.
This is the oval shaped tart mold ("聖安娜蛋撻mold") I bought from my HK visit this past winter.
Assortment of mini fruit tarts using my favorite fruits: strawberry, blueberry, and kiwi. Love the color!
I brought this batch to BSE and everyone loves it. This is the beauty and joy of working in the kitchen. It felt so good to be able to make something with your hands that people enjoy and appreciate. There was this lawyer who tried my tart and came in my office to share his cooking experience with me. Before this, I would have never thought he go into the kitchen at all. Again, food does magically bring people together and it often strikes good conversations with people whom you did not think you could have bonded with.
Sunday, May 1, 2011
Tiramisu
This is a tiramisu Ca and I made for Ju姐's birthday last week. For this cake, we had used a 7'' springform pan which serves 8 people. However, please note that the recipe presents below is for a bigger pan (9x13'' pan). So you might want to do the math to adjust all ingredients proportionally if you want make a 7'' cake.
Ingredients:
7 yolks
½ cup (100g) sugar (or less 75g) – ½ for yolks and ½ for white
3 8-oz. (227g) container mascarpone
41/2 tablespoons water
11/2 tablespoons powdered gelatin (use less next time – 1 Tbsp)
3 egg whites
1 cup heavy cream, whipped (dissolve 1 Tbsp espresso powder into cream before whipping)
2 cups cooled espresso
1 cup liquor (I used Bailey)
20-24 ladyfingers
Cocoa powder
For ladyfingers, I personally prefer to use the packaged ones (below) instead of the freshly baked ladyfingers find in local bakery/grocery stores because packaged ladyfingers are thicker, and can absorb more espresso/liquor mixture without getting too soggy so the to keep their shape better.
Directions:
1) In a large mixing bowl stir to combine the whipping cream and the espresso powder. Cover and chill the bowl and beaters in the refrigerator for at least 30 minutes.
2) Pour water into a small bowl then pour powdered gelatin over it. Do no stir. Allow gelatin to absorb all of the water (about 15 minutes) then place the bowl on top of a small saucepan containing simmering water (creating a double boiler).
3) Immediately turn off the heat and allow the gelatin to dissolve completely.
4) In a mixer with the whip attachment, whip yolks and ½ of the sugar until thick and pale in color (ribbon stage).
5) Add mascarpone and whip until well incorporated
6) In a separate bowl, whip egg whites to a soft beak, gradually add ½ of the sugar, then slowly pour in dissolved gelatin. Whip to a stiff, glossy peak
7) When the whipping cream is chilled, beat the mixture until stiff peaks form.
8) Fold whites into mascarpone and yolk mixture then fold in whipped cream.
9) In a separate bowl, combine espresso and liquor.
10) Soak 1 ladyfinger at a time in the espresso mixture.
If you are making round shaped tiramisu using a springform pan, soak ladyfingers in espresso mixture and line up again the rims. Also place some ladyfingers side by side in a single layer over the bottom of the pan. Spoon 1/3 of the cream fillings over the ladyfingers making sure they are completely covered.
Repeat with another layer of ladyfingers by dipping them in the coffee/liquor mixture and placing them on top of the cream. Again, cover the ladyfingers with a layer of cream. Cover the Tiramisu with plactic wrap and refrigerate at least 6 hours, preferably overnight.
Wednesday, April 13, 2011
Very chocolaty chocolate cheesecake
Japanese Green Tea Red Bean Mouse Cake (日式綠茶紅豆蛋糕)

It's been a WHILE, actually a long while since my last post. It's not that I have forgotten this lovely cooking space, but rather I had been insanely busy the past 5 months! Needless to say, I took a 1.5 month vacation to Asia where I indulged myself in the shopping and food paradise. And immediately after my "luxurious" vacation, I got penalized for the crazy audit busy season! So don't be jealous, life is FAIR... Anyways, before I took off to vacation in late November, I have tried this yummy Japanese cake receipe which it immediately became my favorite cake recipe! I always believe that the combination of green tean and red bean makes the best combo and this recipe combines the best of both world. This cake is really easy to make, though it's more time-consuming... Part 1 – Sponge Cake (use 7” or 8” cake pan) Refer to Sponge/Chiffon Cake recipe
Monday, October 4, 2010
瑞士卷 (swiss roll) @@@
要做好的蛋卷原来不是想象的容易,首先要蛋糕底要做的鬆軟有蛋味,然后卷也要很有技巧。 话说第一次做这个蛋卷时没有把功課做好,把它低估了。 蛋糕底做的不够鬆軟而且還甜的厲害! 卷的時候又没有準備牛油纸,所以卷不成!徹底失敗!
第二次做準備功夫做好了点,換了個蛋糕底recipe,我找了很久才找到個滿意的海棉蛋糕recipe。 做出來效果错, 很鬆軟, 但就觉得不够甜. 有待改良!至于卷的技巧,我在youtube學了卷手勢,大概都拿捏到80%才做。
這次是第三次嘗試,終于都可以見人啦! 海棉蛋糕的甜度剛剛好! 今次卷了倆條,一條是纯忌廉, 另外一条是鲜士多啤梨。
食譜:
蛋糕材料: (這個是我焗雪芳蛋糕的食譜)
雞蛋: 5隻 (4隻蛋黃, 5隻蛋白), 室溫
砂糖: 3.1 tbsp
鹽: 1/8 teaspoon
麵粉: 6.3 tbsp
沙拉油: 2.5 tbsp
鮮奶: 3.5 tbsp
牛油忌廉材料
鮮忌廉 (whipping cream): 1 杯
砂糖: 1 tbsp
檸檬香油: 1 teaspoon
蛋糕做法
1. 先準備焗盆舖上牛油紙
2. 沙拉油+鮮奶攪拌混合, 加入砂糖
3. 麵粉過篩後加進1)
4. 分两次加入蛋黄 , 攪拌變蛋黃糊
5. 用另一隻攪拌盆,蛋白打至企身
6. 把蛋黃糊倒入加蛋白霜,用橡皮刀輕手以切拌方式(fold-in)攪拌至混合, 不要打圈攪拌
7. 倒入已舖上牛油紙的焗盆中
8. 入焗爐中層以 350 F 焗 15 分鐘.
牛油忌廉
鲜忌廉细砂糖打发至企身,草莓切顆
蛋糕涼後抹上鲜奶油
再放入草莓
卷的過程比較複雜和考手工, 所以我都就不寫出來. 我在youtube 找到個很好的video, 跟著做就可以啦, 我也是在那學的!
http://www.youtube.com/watch?v=5qN0whe5ZFc&playnext_from=TL&videos=bo_jEC323vY
Sunday, October 3, 2010
鮮奶土司 (Pain De Mie)~~~
143g fresh milk (I used 1% low-fat fresh milk)35g egg (~1 egg)25g caster sugar5g salt (~1 tsp plus ¼ tsp)250g All purpose flour4g Instant yeast (~1 tsp plus ¼ tsp)38g unsalted butter (1/2 stick)
Procedures:
In a small saucepan, gently heat the milk and water over low heat until lukewarm
Stir in the sugar, then sprinkle on the yeast and let stand for 10 minutes
Combine the flour, salt, and egg in a electric mixer (I personally used a spatula to mix instead of an electric mixer)
Make a well in the center and add the yeast mixture, mixing until incorporated
Add the butter and mix until blended
Knead for 10 minutes, either by machine or by hand on a floured work surface (I did it by hand)
Form into a ball, set in the center of a buttered bowl, cover, and let rise for 1 hour, or until approximately doubled in volume
Remove the dough from the bowl, punch out the gas, knead briefly (5 min). Divide the dough into 2 equal portion, roll and shape into balls. Let the dough rest for another 15 min
On a lightly flour surface, flatten one dough and roll out into a longish shape. Roll up the dough swiss-roll style. Do the same for the other dough
Flatten the rolled up dough and roll out again into a long rectangular shape. Roll up tightly, and make as many rolls as you can, swiss-roll style for the second time. Do the same for the other dough
Place dough in a lightly buttered bread tin. Let the dough proof for the second time (for another 30 min or until it fills up 80% of the tin). Cover with cling wrap.
Preheat the oven to 395F. Place the loaf in the center of the over, with a baking sheet over the foil to create flat top. Bake 30-35 min, or until the top of the loaf is golden and bottom sounds hollow when tapped.
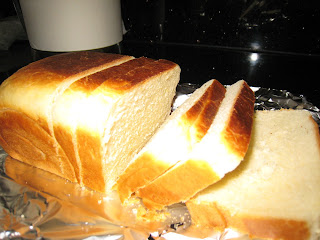
Unmold the bread and cool completely on a wire rack
8 ½ X 4 ½ X 2 ½ pan
Recipe Source: from "Paris Boulangerie, Patisserie" with variations ----a gift from a friend of mine :)
Saturday, September 11, 2010
牛油皮蛋撻
牛油撻皮
麵粉 (all purpose): 13 oz
牛油: ½ lbs, or 2 sticks
雞蛋: 半 個
糖粉: 2 oz
蛋漿:
砂糖:4 oz
清水: 12 oz
雞蛋: 5 ½ 個
鮮奶: 5 oz
奶油: 2 oz (optional, 加了比較香)
雲呢拿油(Vanilla extract): 少許
做法
牛油撻皮:
1. 牛油要室温加雞蛋攪勻直至creamy, 加糖粉繼續攪勻
2. 加入已過篩的麵粉用手搓成麵團
3. 把麵團擀至6mm 厚 (每個蛋撻皮大約1 oz 重), 壓在撻模內
蛋漿:
1. 用火煮溶砂糖, 待涼....雞蛋+淡奶拌勻 , 加入糖水後不停攪勻
2. 用隔篩, 隔2-3次蛋漿, 令蛋漿滑身.....
倒蛋漿入撻模內至9成滿, 以400度焗17分鐘, 然後轉到450 度焗4分鐘至熟透, 完成!
Note: 因應每個焗爐火力不同, 要自己睇火!
Sunday, July 25, 2010
Summer Fruit Tart
Ingredients:
1 1/2 cups (195 grams) all purpose flour
1/8 teaspoon salt
1/2 cup (113 grams) unsalted butter
1/6 cup (35 grams) granulated white sugar
1 large egg, lightly beaten
Pastry Cream:
1 1/4 cups (300 ml) milk
1/2 vanilla bean, split lengthwise
3 large egg yolks
1/6 cup (35 grams) granulated white sugar
¼ cup (40 grams) all-purpose flour
Apricot Glaze:
1/2 cup (125 grams) apricot jam or preserves
1 tablespoon water
Topping:
Blueberries and strawberries, or other mixed fruits of your choice
1. In a separate bowl, sift or whisk together the flour and salt.
2. Place the butter in your mixer and beat until softened. Add sugar and beat until light and fluffy. Gradually add the beaten egg, beating just until incorporated. (Do not over mix or the butter will separate and lighten in color.)
3. Add flour mixture all at once and mix just until it forms a ball. (Do not over mix or the pastry will be hard when baked.) Flatten the pastry into a disk, cover with plastic wrap, and refrigerate for 40 minutes or until firm.
4. Have ready a tart pan (I used a smaller tart pan, around 5’’ so this recipe actually made two tart) .
5. On a lightly floured surface, roll out the pastry into an circle that is about 1/8 inch (3 mm) thick. To prevent the pastry from sticking to the counter and to ensure uniform thickness, keep lifting up and turning the pastry a quarter turn as you roll (always roll from the center of the pastry outwards to get uniform thickness). I also used parchment paper at the bottom to prevent the sticking. To make sure it is the right size, take your tart pan, flip it over, and place it on the rolled out pastry. The pastry should be about an inch larger than pan.
6. When the pastry is rolled to the desired size, lightly roll pastry around your rolling pin, dusting off any excess flour as you roll. Unroll onto top of tart pan. Never pull pastry or you will get shrinkage (shrinkage is caused by too much pulling of the pastry when placing it in the pan). Gently lay in pan and with a small floured piece of pastry, lightly press pastry into bottom and up sides of pan. Roll your rolling pin over top of pan to get rid of excess pastry. With a thumb up movement, again press dough into pan. Roll rolling pin over top again to get rid of any extra pastry. Prick bottom of dough (this will prevent the dough from puffing up as it bakes). Cover and refrigerate for 20 minutes to chill the butter and to rest the gluten.
7. Preheat oven to 400 degrees F and place rack in center of oven. Line unbaked pastry shell with parchment paper or aluminum foil. Fill tart pan with pie weights, rice or beans, making sure the weights are to the top of the pan and evenly distributed over the entire surface. Bake crust for 20 to 25 minutes until crust is dry and lightly golden brown. Remove weights and cool crust on wire rack before filling.
Pastry Cream:
1. In a medium-sized stainless steel bowl, mix the sugar and egg yolks together with a spoon. (Never let the mixture sit too long or you will get pieces of egg forming.) Sift the flour and then add to the egg mixture, mixing until you get a smooth paste. Set aside.
2. Meanwhile, in a saucepan combine the milk and vanilla extract on medium heat until boiling. (The milk will foam up to the top of pan when done, so watch carefully.) Remove from heat and add slowly to egg mixture, whisking constantly to prevent curdling. (If you get a few pieces of egg (curdling) in the mixture, pour through a strainer.)
3. Place the egg mixture back into a medium saucepan and cook over medium heat until boiling, whisking constantly. When it boils, whisk mixture constantly for another 30 - 60 seconds until it becomes very thick and it is hard to stir.
4. Remove from heat and pour into a clean bowl and immediately cover the surface with plastic wrap to prevent a crust from forming. Cool. If not using right away refrigerate until needed, up to 3 days. Beat before using to get rid of any lumps that may have formed.
Apricot Glaze:
Heat the apricot jam or preserves and water (if using) in a small saucepan over medium heat until liquid (melted). Remove from heat and strain the jam through a fine strainer to remove any fruit lumps. Let cool until it is only slightly warm.
To Assemble Tart:
1. To remove the tart from the pan gently
2. Spread a thin layer of apricot glaze or melted chocolate over the bottom and sides of tart to prevent the crust from getting soggy. Let the glaze dry between 20 - 30 minutes.
3. Spread the Pastry Cream into the tart, filling about 3/4 full. Level with an offset spatula.
4. To decorate the tart you will need 2 to 3 cups (480 - 620 ml) of mixed fresh berries. Prepare the fruit by gently washing and drying. The strawberries will need to be sliced also. Arranging the fruit on the tart can be done either randomly or in concentric overlapping circles, starting at the outside edge. Try to cover all the pastry cream with fruit so that no pastry cream is showing through.
5. After arranging the fruit, rewarm the glaze, if using, and gently brush a light coat on the fruit. The idea is to make the fruit look shiny. If not serving immediately, refrigerate. Take out about 30 minutes before serving to give the fruit and cream a chance to warm to room temperature.
Note: the basic recipes came from the above source. As for all my cooking, the recipes I included here are modified based on my family and friends’ taste bug.
Thursday, July 1, 2010
Blueberry streusel muffins
Summer is abundance of fresh berries. Out of all berries, my top two all time favorites are strawberry and blueberry. I love blueberry muffins! It's my favor pick from the morning office meetings and my favorite pastry from starbucks (i love the streusel topping sprinkled over the top of the muffins). I have long wanted to make this little favorite of mine. Last weekend we went to Napa for wine tasting and it's the perfect time to have some home-made muffins for breakfast before we start the long day drinking..and we even brough some to Napa to eat along with wine!
Ingredients: for 15 muffins
· 1 cup milk ( I used 1% milk as this is what I typically have at home)
· 2 large eggs, 1 white
· 1 teaspoon of pure vanilla extract
· 3 cups all purpose flour
· ½ cup of granulated white sugar
· 1 tablespoon baking powder
· ½ teaspoon salt
· 2/3 cup (2/3 stick) unsalted butter, chilled and cut into small pieces
· 1.5-2 cups fresh blueberry
· ½ tablespoon grated lemon zest
· 1/3 cup (1/3 stick) unsalted butter
· 2 tablespoon nonfat yogurt
Procedures:
For muffins:
1. Preheat over to 350 degrees . Place rack in the middle of oven
2. Line 15 muffin cups with paper liners
3. In a bowl, mix together: milk, eggs, yogurt and vanilla extract
4. In a large mixing bowl, combine the flour, sugar, baking powder, and salt. Cut the butter into small pieces and blend into flour mixture with a pastry blender or a knive. This mixture should look like coarse crumbs. Remove 2/3 cup of the mixture and set aside in a separate bowl to make the streusel topping.
5. To the remaining muffin batter in 4), gently fold in the blueberries and lemon zest. Add in the milk and egg mixture to the flour mixture. Stir until just combine (do not over mix this mixture or the muffin will be tough when baked).
6. Fill each muffin cup with the batter using an ice cream scoop.
For streusel topping:
1. Melt the remaining 1/3 stick butter and drizzle over the reserve 2/3 cup of streusel topping. Mix together with a folk until it’s crumbly and it looks like coarse meal.
2. Springkle a couple of teaspoons of the streusel over the top of each muffin.
Place the muffins in the over and bake until very lightly brown and firm to the touch and a toothpick inserted in the center comes out clean about 20-25 minutes. Place on wire rack to cool.
the end product:
recipe adapted from http://www.joyofbaking.com/
Note: the basic recipes came from the above source. As for all my cooking, the recipes I included here are modified based on my family’s taste bug (e.g. I normally cut the sugar portion by 1/3-1/2) and my preference.