Saturday, May 7, 2011

古法炆牛腩

昨天Mr. F問我這個周末是否又再家煮新菜. 我說不會因為根本沒打計劃甚麼新菜要拭. 後來媽媽早上告訴我說給我買了牛腩要求我煮. 註: 媽媽因不吃牛的關系所以通常不會煮牛的菜式. 如此如此這麼這麼, 我end up cooking this weekend.


這個炆牛腩的recipe其實好簡單, 是牛腩的最基本煮法. 不過好吃的食物通常做法都是最原始的. Back to the basic 嘛! 所以雖然簡單我也想在這跟你們分享 :)


小tips: 牛腩汆水後,下柱侯醬炒過才炆,比沒炒過的更入味香口. 柱侯醬配合上湯一同炆牛腩,更滋味。


材料
黃牛坑腩︰ 3lbs


蘿蔔︰ 2lbs


陳皮︰ 3塊


蒜茸︰ 3湯匙
生薑: 數片


調味料
柱侯醬︰ 5湯匙


上湯︰ 4湯勺


蠔油︰ 3湯匙


鹽︰ 1/3湯匙


冰糖︰2湯匙


酒︰1湯匙


濕生粉︰ 2湯匙

做法
1.將牛坑腩切件(每件分量約兩隻麻雀牌般大小),放入滾水中汆水八分鐘,盛起過冷河。2.把蘿蔔切件,切成斧頭形狀,放在滾水中汆水約兩分鐘,盛起。3.下大半湯勺油,爆香蒜茸、陳皮和柱侯醬。4.下牛腩及蘿蔔同炒,灒酒,加入上湯、蠔油、鹽、糖及老抽。5.轉用瓦煲以慢火炆一個多小時後,下生粉芡使醬汁變稠身。


Original reference: 高校教室

Thursday, May 5, 2011

Mini Fruit Tarts


As things slow down on BSE (client) last week, and as an appreciation to their helps this year, I baked them a batch of mini fruit tarts. I have made large fruit tarts before. Making mini fruit tarts, however, it's my first time. The recipe and procedures are the same. The only difference is that you are working off mini pieces pastry dough vs. the one huge dough you need to roll out for the big tarts. And as expected, rolling out the mini dough is much easier because when the dough is smaller the risk of breaking into clumps and cracks become smaller. In case you haven’t read my post on fruit tarts below, the single biggest stumbling blocks to tart baking (in my opinion) is rolling out the tart dough. So if you are an amateur baker like me and would like to try out making tarts, it’s probably a good idea to start with mini fruit tarts.

Since I have shared the fruit tart recipe in my previous post, I am not going to repeat it again. Everything else is the same except for the portion. This time I have doubled the portion of the recipe to make 16 oval shaped tarts and 17 mini muffin tine tarts.

This is the oval shaped tart mold ("聖安娜蛋撻mold") I bought from my HK visit this past winter.


extra mini tart using the mini muffin tin.


Assortment of mini fruit tarts using my favorite fruits: strawberry, blueberry, and kiwi. Love the color!

I brought this batch to BSE and everyone loves it. This is the beauty and joy of working in the kitchen. It felt so good to be able to make something with your hands that people enjoy and appreciate. There was this lawyer who tried my tart and came in my office to share his cooking experience with me. Before this, I would have never thought he go into the kitchen at all. Again, food does magically bring people together and it often strikes good conversations with people whom you did not think you could have bonded with.

Sunday, May 1, 2011

Tiramisu

I just realized I've never made a post on Tiramisu! Tiramisu is my very first experience doing real baking at home. Tiramisu often gives people a "difficult to make" impression due to its complex taste. Though I probably wouldn't recommend it to entry level bakers, I actually don't think tiramisu is as difficult as it sounds. It's a simple "no-bake" cake that also involves mixing of all ingredients. The only key to make it tastes right it's getting the correct proportion of espresso and liquor (tips: my experience has taught me the type of liquor also makes a big difference. For the below recipe I have used Bailey as I found it blend in best with espresso).

This is a tiramisu Ca and I made for Ju姐's birthday last week. For this cake, we had used a 7'' springform pan which serves 8 people. However, please note that the recipe presents below is for a bigger pan (9x13'' pan). So you might want to do the math to adjust all ingredients proportionally if you want make a 7'' cake.


Ingredients:
7 yolks
½ cup (100g) sugar (or less 75g) – ½ for yolks and ½ for white
3 8-oz. (227g) container mascarpone
41/2 tablespoons water
11/2 tablespoons powdered gelatin (use less next time – 1 Tbsp)
3 egg whites
1 cup heavy cream, whipped (dissolve 1 Tbsp espresso powder into cream before whipping)
2 cups cooled espresso
1 cup liquor (I used Bailey)
20-24 ladyfingers
Cocoa powder

For ladyfingers, I personally prefer to use the packaged ones (below) instead of the freshly baked ladyfingers find in local bakery/grocery stores because packaged ladyfingers are thicker, and can absorb more espresso/liquor mixture without getting too soggy so the to keep their shape better.


Directions:
1) In a large mixing
bowl stir to combine the whipping cream and the espresso powder. Cover and chill the bowl and beaters in the refrigerator for at least 30 minutes.
2) Pour water into a small bowl then pour powdered gelatin over it. Do no stir. Allow gelatin to absorb all of the water (about 15 minutes) then place the bowl on top of a small saucepan containing simmering water (creating a double boiler).
3) Immediately turn off the heat and allow the gelatin to dissolve completely.
4) In a mixer with the whip attachment, whip yolks and ½ of the sugar until thick and pale in color (ribbon stage).
5) Add mascarpone and whip until well incorporated
6) In a separate bowl, whip egg whites to a soft beak, gradually add ½ of the sugar, then slowly pour in dissolved gelatin. Whip to a stiff, glossy peak
7) When the whipping cream is chilled, beat the mixture until stiff peaks form.
8) Fold whites into mascarpone and yolk mixture then fold in whipped cream.
9) In a separate bowl, combine espresso and liquor.
10) Soak 1 ladyfinger at a time in the espresso mixture.

If you are making round shaped tiramisu using a springform pan, soak ladyfingers in espresso mixture and line up again the rims. Also place some ladyfingers side by side in a single layer over the bottom of the pan. Spoon 1/3 of the cream fillings over the ladyfingers making sure they are completely covered.


Repeat with another layer of ladyfingers by dipping them in the coffee/liquor mixture and placing them on top of the cream. Again, cover the ladyfingers with a layer of cream. Cover the Tiramisu with plactic wrap and refrigerate at least 6 hours, preferably overnight.


To serve: remove the plactic wrap from the top of the tiramisu, sift cocoa powder over the top of the tiramisu or decocrate with shedded chocolate.


I made two layers, but you can make as many as you like depending on the size of your pan.


Wednesday, April 13, 2011

Very chocolaty chocolate cheesecake

A very belated post again. I made this chocolate cheesecake to celebrate dearest Ca's birthday. Since Ca is a chocolate lover, I thought of making her something with a chocolaty. I found this recipe from one of my favorite bloggers' website: http://lateliervi.blogspot.com and it seems pretty legit. Cheesecake is one of the easiest and yummiest cake to bake and it could never go wrong! So I baked this for her w/o having to take a first try myself. Luckily it turn out to be very delicious.


Make one 8 inches (1 ½ high) cake


Cheese mixture 300g cream cheese200ml whipping cream120g caster sugar2 whole eggs4tbs cocoa powder4tsp freshly squeeze lemon juiceCrust180g Oreo cookies (w/o filling)100g unsalted butter Prep: - Wrap the cream cheese in plastic food wrap and place in microwave on low for 2 minutes to soften it.


- Preheat oven to 160 degree C/325 degree F.


- Wrap the bottom (up to half way) of the pan with 2 layers of foil paper.


- Boil some water for later use (appx. 2 liter).


For the crust:


-Break the cookies into small pieces, then place into a zip lock bag or any heavy weight plastic bag (remove air bubbles), and crush + roll using a rolling pin until cookies become fine crumb.


-Place butter in microwave and heat for 1 mins. over medium heat.


-Pour melted butter into the bag, remove air bubble and close the bag, then shake it to mix the two.


-Pour this mix into the pan; using the back of a large spoon, press crumb firmly to pan until packed; set aside.


For the cheesecake:


-Place the cream cheese in a mixing bowl. Using a whisk, whisk cream cheese until blended; add the other ingredients in the following order, sugar --> cocoa powder --> eggs --> lemon juice --> whipping cream, make sure that each item is well blended before adding another.


-Strain the cheese mixture then pour into the cake pan.


-Pour hot water (1 inch in depth) into a roasting pan, place the pan inside the roasting pan and bake for 90minutes. If the water dried out while baking, be sure to refill with more hot water. Once the center of the cake no longer quiver and the sides begin to pull away from the pan then it is done.


-Remove from oven and let cool completely on wire rack. Place in fridge for 3 hours or overnight to set.


Dark Chocolate Glazing


-100g whipping cream125g water40g cocoa powder160g granulated sugar10g gelatin


Prep:


- Pre-soak gelatin in a bowl of cold water, squeeze out excess water; set aside. If using powdered gelatin, add 2 spoon of water.


- Using a small round cookie cutter, scrape curls off a block of white chocolate. Place whipping cream, sugar and water in a saucepan and bring to boil over medium heat. Then add in the cocoa powder and bring to boil again or till mixture slightly thicken; stir constantly to avoid mixture sticking to saucepan.


-Remove from heat and let cool for a few minutes then add the pre-soaked gelatin; stir until completely melted; strain.


-When cool to lukewarm, pour glazing onto cheesecake and let some drip down the sides. Place back into fridge for another 30 minutes.


Decorate the cake with white chocolate curls before serving.

Japanese Green Tea Red Bean Mouse Cake (日式綠茶紅豆蛋糕)


It's been a WHILE, actually a long while since my last post. It's not that I have forgotten this lovely cooking space, but rather I had been insanely busy the past 5 months! Needless to say, I took a 1.5 month vacation to Asia where I indulged myself in the shopping and food paradise. And immediately after my "luxurious" vacation, I got penalized for the crazy audit busy season! So don't be jealous, life is FAIR... Anyways, before I took off to vacation in late November, I have tried this yummy Japanese cake receipe which it immediately became my favorite cake recipe! I always believe that the combination of green tean and red bean makes the best combo and this recipe combines the best of both world. This cake is really easy to make, though it's more time-consuming... Part 1 – Sponge Cake (use 7” or 8” cake pan) Refer to Sponge/Chiffon Cake recipe


Part 2 – Cake crust (use 8 inch cake pan) Ingredients · 1 cup graham cracker crumbs · 1 Tbsp sugar · 4 Tbsp (1/2 stick) unsalted butter, melted · Pinch of ground cinnamon Procedures: 1. Preheat oven to 350 degrees F. 2. Mix together cracker crumbs, sugar and cinnamon, then add in melted butter until moist crumbs form 3. Press the cracker mixture onto the bottom of the prepared pan 4. Bake the crust until it is set and beginning to brown, about 12 minutes. Cool.


Part 3a – Red Bean Cheese Mousse Ingredients · 120g mascarpone cheese · 30g sugar · 200g red bean paste · 30g milk · 200g whipping cream · 6g (1 1/3 tsp) gelatin · 30g water Procedures: 1. Pour gelatin over water, put over double boiler to allow it to dissolve completely in the water 2. Beat whipping cream until stiff peak form 3. Beat the mascarpone cheese with a electric mixer to lighten it up then add sugar 4. Fold in milk, in two additions 5. Fold in whipping cream into cheese mixture, in 3 additions, then fold in red bean paste, gelatin mixture 6. Place a small amount of red bean cheese mixture in the center of the cake pan, then place the sponge cake in the middle to hold it in place 7. Pour all of the red bean cheese mixture into the cake pan 8. Refrigerate for at least 1 hour


Part 3b – Green Tea Mousse Ingredients · 100g whipping cream · 40g sugar · 6g (1 1/3 tsp) green tea powder · 3g (2/3 tsp) gelatin · 30g water Procedures: 1. Pour gelatin and green tea powder over the water, put into double boiler and allow them to dissolve completely into the water 2. Beat whipping cream until stiff peak, fold in green tea gelatin mixture 3. Pour green tea mixture over the refrigerated red bean cheese mousse 4. Refrigerate for at least another hour


Part 4 - 蛋糕装飾 - (可以自己随意自由發揮)


Monday, October 4, 2010

瑞士卷 (swiss roll) @@@


从小到大对瑞士卷都有一种情意结,其事真係唔知点解,觉得它们可爱到不得了。 一直都好想学做,最近終于拿起心肝学! 哈哈,致从失敗的第一次以后,我好像上了瘾似的,非要把它学会不行!

要做好的蛋卷原来不是想象的容易,首先要蛋糕底要做的鬆軟有蛋味,然后卷也要很有技巧。 话说第一次做这个蛋卷时没有把功課做好,把它低估了。 蛋糕底做的不够鬆軟而且還甜的厲害! 卷的時候又没有準備牛油纸,所以卷不成!徹底失敗!

第二次做準備功夫做好了点,換了個蛋糕底recipe,我找了很久才找到個滿意的海棉蛋糕recipe。 做出來效果错, 很鬆軟, 但就觉得不够甜. 有待改良!至于卷的技巧,我在youtube學了卷手勢,大概都拿捏到80%才做。

這次是第三次嘗試,終于都可以見人啦! 海棉蛋糕的甜度剛剛好! 今次卷了倆條,一條是纯忌廉, 另外一条是鲜士多啤梨。


食譜:


蛋糕材料: (這個是我焗雪芳蛋糕的食譜)
雞蛋: 5隻 (4隻蛋黃, 5隻蛋白), 室溫
砂糖: 3.1 tbsp
鹽: 1/8 teaspoon
麵粉: 6.3 tbsp
沙拉油: 2.5 tbsp
鮮奶: 3.5 tbsp


牛油忌廉材料
鮮忌廉 (whipping cream): 1 杯
砂糖: 1 tbsp
檸檬香油: 1 teaspoon

蛋糕做法
1. 先準備焗盆舖上牛油紙
2. 沙拉油+鮮奶攪拌混合, 加入砂糖
3. 麵粉過篩後加進1)
4. 分两次加入蛋黄 , 攪拌變蛋黃糊
5. 用另一隻攪拌盆,蛋白打至企身
6. 把蛋黃糊倒入加蛋白霜,用橡皮刀輕手以切拌方式(fold-in)攪拌至混合, 不要打圈攪拌
7. 倒入已舖上牛油紙的焗盆中
8. 入焗爐中層以 350 F 焗 15 分鐘.


牛油忌廉
鲜忌廉细砂糖打发至企身,草莓切顆

蛋糕涼後抹上鲜奶油


再放入草莓


卷的過程比較複雜和考手工, 所以我都就不寫出來. 我在youtube 找到個很好的video, 跟著做就可以啦, 我也是在那學的!


http://www.youtube.com/watch?v=5qN0whe5ZFc&playnext_from=TL&videos=bo_jEC323vY


Sunday, October 3, 2010

鮮奶土司 (Pain De Mie)~~~


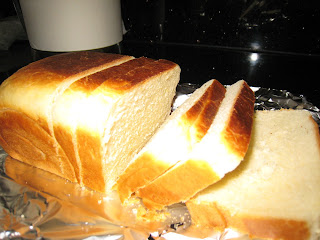
Another one of my all time childhood favorite is 鮮奶土司, or pain de mie in french. Long wanted to try, finally have had a chance to this weekend :)


This is actually my second loaf of bread. My first loaf, a whole wheat loaf, was a failture because I forgot to let it rise for the 2nd time. As a result, the texture turned out to be really densed. This time around, I alter the recipe a little bit, cut the portion of the flour, and instead of being creative using whole wheat flour, I returned to the basic using white flour. I guess I cut too down the portion by a litle bit too much, the dough didn't fill up the entire tin. I guess the portion of flour used (250g) is not enough to fill up a 8 ½ X 4 ½ X 2 ½ tin.


Nevertheless, despite the shape, the texture of the bread is exactly what I have been looking for. It's super soft and cottony! It's tastes even as good after it cools down and I didn't have to toast it.


Ingredients:
143g fresh milk (I used 1% low-fat fresh milk)35g egg (~1 egg)25g caster sugar5g salt (~1 tsp plus ¼ tsp)250g All purpose flour4g Instant yeast (~1 tsp plus ¼ tsp)38g unsalted butter (1/2 stick)


Procedures:

In a small saucepan, gently heat the milk and water over low heat until lukewarm
Stir in the sugar, then sprinkle on the yeast and let stand for 10 minutes
Combine the flour, salt, and egg in a electric mixer (I personally used a spatula to mix instead of an electric mixer)
Make a well in the center and add the yeast mixture, mixing until incorporated
Add the butter and mix until blended
Knead for 10 minutes, either by machine or by hand on a floured work surface (I did it by hand)
Form into a ball, set in the center of a buttered bowl, cover, and let rise for 1 hour, or until approximately doubled in volume
Remove the dough from the bowl, punch out the gas, knead briefly (5 min). Divide the dough into 2 equal portion, roll and shape into balls. Let the dough rest for another 15 min
On a lightly flour surface, flatten one dough and roll out into a longish shape. Roll up the dough swiss-roll style. Do the same for the other dough
Flatten the rolled up dough and roll out again into a long rectangular shape. Roll up tightly, and make as many rolls as you can, swiss-roll style for the second time. Do the same for the other dough
Place dough in a lightly buttered bread tin. Let the dough proof for the second time (for another 30 min or until it fills up 80% of the tin). Cover with cling wrap.
Preheat the oven to 395F. Place the loaf in the center of the over, with a baking sheet over the foil to create flat top. Bake 30-35 min, or until the top of the loaf is golden and bottom sounds hollow when tapped.
Unmold the bread and cool completely on a wire rack

8 ½ X 4 ½ X 2 ½ pan


Recipe Source: from "Paris Boulangerie, Patisserie" with variations ----a gift from a friend of mine :)